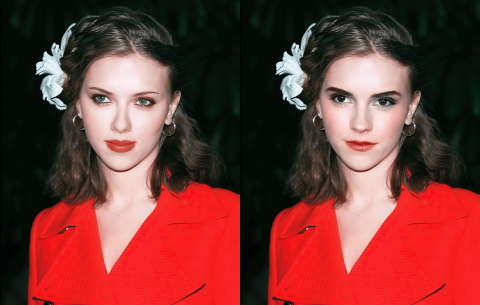
Ever tried an AI face swap—dropping your face into a photo or video—then taken one look and cringed?
The skin looks like a plastic mannequin. The face sits on top like a sticker. Or it just doesn’t quite look like the person.
Here’s the good news: it’s almost never your fault, and it doesn’t mean your tool is bad.
A face swap looks fake not because of one single thing, but because a bunch of small problems pile up: the lighting is off, the skin tone doesn’t match, it’s not sharp enough, the angle is wrong, the edges show.
Get any one of them wrong and your brain instantly senses “something’s off,” even if you can’t say what.
This article breaks down, from scratch, why face swaps look fake and exactly how to fix each problem.
It uses some technical terms and names specific tools and settings, but don’t worry: I’ll explain each one in plain language and tell you exactly what to do. You can follow along with zero experience.
It’s organized in three layers:
① the basics everyone should do (most important);
② advanced techniques for top-tier results (with specific tools and settings);
③ the shortcut for people who don’t want to fuss.
Part 1: First, understand why face swaps look fake
Before you do anything, meet the usual suspects. Knowing them tells you where to push.
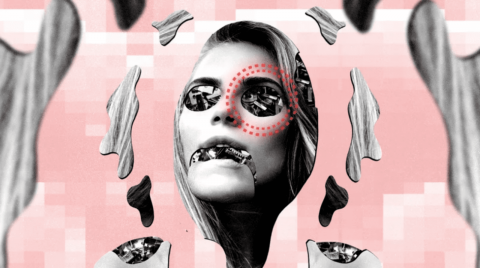
1. Plastic skin (too smooth, like a mannequin).Real skin has pores, fine lines, small spots, and tiny hairs, so light reflects off it unevenly.
AI tends to wipe all those “flaws” away, leaving skin that looks waxed and shiny. So remember: plastic skin isn’t from being too clean—it’s from the skin structure going missing.
The things most often lost: pores, subsurface scattering (that soft, translucent glow from light passing through the top layer of skin), the reflection difference between oily and dry areas, and the nearly invisible peach fuzz on your face.
2. It doesn’t look like the person.Many tools only swap the middle part of the face (the features), while keeping the original photo’s face shape, jaw, and hairline.
The result: “the features are theirs, but the whole person doesn’t look like them.”
3. The lighting direction doesn’t match (the easiest giveaway).Say the face you’re swapping in is lit evenly from the front, but the person in the target image is standing against a bright window, so their face should be in shadow.
The swapped face ends up unnaturally bright, and you can tell instantly it’s two images stitched together. The direction light comes from is the tell your eyes are most sensitive to.
4. Skin tone or color doesn’t match.A pale face dropped onto a more tanned or darker body leaves a gray, blotchy, ghostly seam.
5. Not sharp enough, or two images at different sharpness.AI can’t invent detail that isn’t there—feed it a blurry face and you get a wax figure back.
And a super-sharp face on a grainy phone photo looks like a cutout pasted on.
6. The angle is off.A front-facing face forced onto a profile shot always looks wrong. Even one eye a few pixels too high feels off.
7. Visible edges, or a “halo” around the hairline.A good swap has invisible borders. A bad one leaves a hard edge, or a ring of white around the hairline (the pros call that ring a halo).
8. In video, it “falls apart” the moment the head turns.This is the single hardest problem in video face swapping—more on it later.
One-line goal: make the result look like it was shot by one camera, in one environment, in a single take—not like two photos glued together.
Part 2: The basics—90% of a realistic face swap is decided when you pick your images
This is the most important and the simplest rule, so beginners, remember it: rather than fixing things afterward, choose the right images up front.
Even the strongest AI can’t reconcile two photos that fundamentally clash.
First, two terms. The source is the image you’re borrowing a face from (like your selfie). The target is the image or video you want to put the face onto (like a movie clip).
Pick your images by this checklist and your success rate doubles instantly:


- ✅Matching light direction.Ideally both images have light coming from the same side. Pick a target that’s evenly, brightly lit (the “three-point lighting” of pro photography is ideal because the light is predictable).
- ✅Angle difference ≤ 15°.The head orientation in the source and target should be similar (both front-facing, or both slightly turned).Beyond about 15 degrees, things start to warp.
- ✅Sharp and high-resolution.The clearer the source, the better—4K is ideal (4K just means very high resolution). Also keep the face’s “pixel density” similar to the target—don’t paste a 400-pixel face onto a 4000-pixel image, or it’ll smear.
- ✅Close skin tone / color temperature.Warm with warm, cool with cool (color temperature is whether the image leans yellow-warm or blue-cool). Big differences need heavy color correction, which looks faker; in that case,swapping in a source with a closer color temperatureis far easier than forcing corrections.
- ✅Don’t use a beauty-filtered source.Beauty filters smooth the skin, and that fake smoothness gets baked into the result. Use the un-retouched original.
- ✅Face fills ≥ 1/3 of the frame.Too small and the AI doesn’t have enough pixels to rebuild detail.
- ✅Neutral expression, face unobstructed.Hands, hair, and glasses over the face all raise the failure rate.
- ✅(Video) occluded shots under 20% of frames.The AI can “fill in” a brief block, but a long one will always break.
Nail this step and you’re already ahead of most people.
Part 3: Advanced techniques—fixing each face swap problem at its source
This part uses some pro tools and settings. First, a heads-up: the most professional, best-looking route is to run open-source AI on your own computer, using software calledComfyUI.

ComfyUI is like building an “AI image-processing assembly line” on your computer—you connect functional blocks (called “nodes”) like LEGO, and data flows from one end to a finished result.

It’s free, extremely powerful, and very flexible, but the barrier is high: you install software, download models, and need a decent graphics card (16GB of VRAM recommended; VRAM is the memory on your graphics card dedicated to images).
If you don’t want to install it yourself and don’t have a good GPU, ComfyUI now also has a cloud version—use it right in your browser, no setup—but it’s paid.
Don’t want to fuss? Skip straight to Part 4’s shortcut. Want to learn? Spend ten minutes on the “basics” section below and you’ll be able to follow along.
Lay the foundation first: 4 basic ComfyUI moves (read this and you can start)
Everything below builds on these moves. Learn them and the rest is just “add a node, change a number.”
① Install ComfyUI.The easiest way is the official desktop app (ComfyUI Desktop): go tocomfy.org/download, download the installer, and double-click to install like any normal program.
It auto-configures the environment, drops an icon on your desktop, and you’re in. Note the hardware bar: the Windows version needs an NVIDIA card (no AMD support) with at least 4GB of VRAM; Mac needs Apple Silicon (M1/M2/M3-type) chips.
If your computer doesn’t qualify and you don’t want the hassle, use the cloud version mentioned above (browser-based, paid).
② Meet the “app store”—ComfyUI Manager.The desktop app already includes it (a button labeled Manager). It’s the “app store” for installing all those plugins/nodes.
Whenever I say “install a node,” the steps are the same: click Manager → Custom Nodes Manager → type the name in the search box → click Install → restart ComfyUI as prompted and refresh the page.

③ Know where models go.Model files you download go into themodelsfolder inside your ComfyUI install, sorted by type: base models incheckpoints, LoRAs inloras, upscale models inupscale_models, VAEs invae.
On desktop, finding that folder is easy: top menu Help → Open Folder → Open Model Folder. After dropping files in, press theRkey back in ComfyUI to refresh, and it’ll detect them.
Models usually come from Civitai, Hugging Face, or a tool’s GitHub page.
④ Learn to add nodes and change settings.Double-click an empty spot on the canvas and a search box pops up; type a node’s name to add it (mind the spaces in the name, or it won’t show up).
The boxes, sliders, and dropdowns on each node are its settings—just click and change them. For example, denoise (mentioned a lot below) lives on a node called KSampler, as a number you can type in.

The easiest path for beginners: don’t wire it from scratch.ComfyUI’s real hurdle isn’t installing it—it’s connecting dozens of nodes into one correct “assembly line.”
So don’t build it by hand. Download a ready-made “face swap / skin enhancement”workflow file(usually a.json, or an image with the workflow embedded) from sites like Civitai or tutorial pages, anddrag it into the ComfyUI windowto load the whole pipeline.

If any node shows upred(meaning you haven’t installed that plugin yet), click“Install Missing Custom Nodes”in the Manager to fix it in one go, then restart.
Finally, drag your own image onto theLoad Imagenode and clickRun(or press Ctrl+Enter).Everything below is basically just “add one node / change one number” inside a ready-made workflow like this.
Solution ① Kill the “plastic skin”: rebuild the skin detail
The idea isn’t to smooth it more—it’s to add real texture like pores and fine lines back in.
What regular users (no ComfyUI) can do:
- Don’t beauty-filter the source, and keep it sharp (this is the foundation).
- Turn on your face-swap tool’s built-in “enhance / face enhancement” toggle—skin texture gets noticeably more real.
- Don’t stack any extra smoothing/beauty post-processing, or you’ll wipe out the realism you just added.
What advanced users do in ComfyUI (step by step):
Step 1: Add a “skin detail LoRA.”A LoRA is like a little patch you attach to the AI model to teach it to draw one kind of thing well—here, realistic skin.
How: on Civitai, search for a skin LoRA likeRealistic Skin Texture (SkinF1dV2.5)orSkin Realism, download it, and drop it into themodels/lorasfolder (press R to refresh).
Back in ComfyUI, double-click empty space, searchLoad LoRA, add it, and pick your downloaded file in its dropdown. It has astrengthvalue—start around 0.2(that’s how strong the patch is; too high and the skin texture goes overboard), and raise it slowly if needed.

Step 2: Use the right “trigger words.”Trigger words are keywords you type into the prompt box to “wake up” the LoRA’s effect.
In your prompt (the text box for positive descriptions), addfreckles,pores,natural skin texture,fine details,imperfections. To make a word count more, put your cursor after it, hold Ctrl, and press ↑ to raise its weight.
Step 3: Install and attach Detail Daemon (a detail-control node).It lets skin “show texture without over-sharpening into something fake.”
How: open Manager → Custom Nodes Manager → searchDetail Daemon→ Install → restart and refresh. Then double-click empty space, searchDetail Daemon Sampler, add it, and connect it into the generation flow as its instructions show.
Or you may download from Github.

The key setting isdetail_amount, default 0.1—raise it for more detail, lower it for less.If the face comes out too sharp, like an over-exposed HDR look, turn detail_amount down a bit.
Step 4: Finish with a “skin-friendly” upscale (crucial—don’t use a plain upscaler).First install the upscale node: searchUltimateSDUpscalein Manager and install it.
Then grab a realistic upscale model fromopenmodeldb.info(beginners can use4x-UltraSharp, or the skin-focused1x ITF SkinDiffDetail Lite), drop it inmodels/upscale_models, and press R to refresh.
Now add theUltimate SD Upscalenode and remember a few numbers: set “Upscale by” to1.5–2; setdenoiseto0.2–0.4(this value matters most—covered next—never set it to 1); chooseKarrasfor the scheduler for smoother results; chooseChessfor the tile mode to reduce seams. It even runs on an 8GB-VRAM machine.
Step 5: Add a touch of grain and light sharpening at the end.Real photos have fine grain; perfectly clean actually looks fake.
How: searchVRGameDevGirlin Manager (this pack includes a node literally calledFast Film Grain, plusFast Laplacian Sharpenfor light sharpening andColor Match to Referencefor color matching) and install it.
AttachFast Film Grainat the end with strength0.1–0.3(turn it down if it’s too noisy), then lightly sharpen withFast Laplacian Sharpen—it won’t create ugly halos.
Now the key setting that keeps coming up—denoise (denoise strength, a.k.a. “how much it repaints”). Here’s the clear version: it decides how much the AI changes your original—0 means no change, 1 means almost fully repainted.
In ComfyUI, this value sits on the node called KSampler (and on Ultimate SD Upscale above), as a number you can type.To preserve your original and only add skin detail, use a small value: 0.05–0.3, commonly around 0.2. Never set it to 1(that tells it to ignore your original and paint a new one from scratch).
The easiest “two-step method” (highly recommended, even semi-beginners can do it):first make a basic swap with any tool, then “gently repaint” the result to add skin—that is, do one image-to-image pass at low denoise (~0.2).
Image-to-image (i2i for short) means feeding the AI an existing image and having it generate from that, not from nothing; with very low denoise, it only refines detail and doesn’t change your person.
Models you can use for this refining pass:Z-Image (ZIT for short),Chroma(run it specifically over the skin), orFlux.2 Klein(prompt “make it higher quality” or “hyperrealism”; set the sampler—the AI’s calculation method—to Heun, and steps—the number of calculation rounds—as low as 3 can still add realism).
There’s also a hidden but key variable: VAE. When the AI works, it compresses the image into data and then restores it back to an image, and the VAE is the part that handles that step—a good VAE restores detail (especially skin texture) more clearly.
The community consensus: the VAE used byFlux.2 Klein(nicknamed VAE2) preserves skin texture better thanQwen Image Edit‘s VAE. Qwen is better at understanding your edit instructions but weaker on texture.
So a common pro combo is:edit/swap with Qwen first, then bring the skin texture back with Klein or Chroma.
One last reminder (a top-voted takeaway from Reddit): if your skin looks too fake, it’s usually not the model—it’s that you “pushed too hard.”
The fix: lower denoise, add “natural skin texture, pores, imperfections” to the prompt, add a layer of grain at the end, andrepaint only the face locally instead of the whole image.
Local repaint (inpaint) means you box off a small area (that selection is called a mask) and let the AI repaint only what’s inside the box, leaving the rest untouched.
Solution ② Upscaling must be “face-friendly”—never use a plain upscaler
The trap beginners fall into most:using a plain “upscale” function to rescue plastic skin—which backfires, making it worse the bigger it gets.
That’s because upscalers come in two types. Restorative ones only sharpen and enlarge without adding detail; creative ones actively add texture and detail. A plain upscale just enlarges the image, making the plastic look even more obvious.
Below are upscale options that tested kinder to skin. You use them the same way as above: either search the node name in Manager, or download the model file into themodels/upscale_modelsfolder, then double-click to find it on the canvas.
- SeedVR2 + SRPO:more realistic on skin than SUPIR—pores look more three-dimensional and flaws are preserved; SUPIR’s output leans “airbrushed.” (These are all names of upscale/refine models.)
- That said,SUPIRis still very strong on general image sharpness (top marks for realism in testing).
- Forvideoupscaling, tryFlashVSR(good detail and realism, and fast).
- Forportraitsspecifically, tryCrystal-upscaler(designed for portraits, preserves skin texture and the person’s identity).
There are also two “face repair” AI models, often used before upscaling, that beginners will run into: GFPGAN and CodeFormer, which sharpen up a blurry face.
GFPGAN produces skin with more “alive” texture, but can sometimes make the face look less like the person. CodeFormer is more stable but tends to over-smooth into plastic.
CodeFormer has a slider called fidelity weight (written as w, range 0–1): the lower w, the sharper and more textured; the higher w, the closer to the original but possibly blurrier and more plastic. To avoid plastic skin, push w lower.
If you use FaceFusion (a common open-source face-swap app), it only does the swap by default, no enhancement. Be sure to turn on thegfpgan_1.4face enhancer and setpixel boostto 512 or above (pixel boost just means processing the face at a higher internal resolution), and the skin texture gets noticeably better.
Solution ③ “Doesn’t look like the person”—you need a head swap, not just a face swap
If “the features are right but the whole person isn’t,” the problem is usually the face shape. A plain face swap only changes the middle features, keeping the original’s face shape and hairline.
The fix is to upgrade to a “head swap”—replacing the whole head (face shape, hairline, jaw included). Here’s how:
- Do a “mask + local repaint” on the head:box off the whole head, repaint only that area at low denoise, leaving the neck and shoulders alone to avoid seams.
- Use a model that takes multiple image inputs (like
Flux.2 KleinorQwen‘s multi-image feature) to do the head swap; in multi-person shots you can even pick which person to replace. - Add a LoRA built to boost likeness, such as
BFS (Best Face Swap)orUltra-Real(for the Klein 9B model).
Also know this trap:diffusion-type AI models tend to impose their own face shape—Klein, for example, often adds “puffy cheeks and a wide nose bridge,” making it look less like the target.
The counter: describe the target’s facial features clearly in the prompt, keep the reference image clean (ideally just head and neck, with the background and body removed), and generate a few times to pick the most accurate one.
For some reassurance: in 2026, academia is actively researching “video head swap”—for example, a result called GSwap that processes head swaps in 3D space so they stay dimensionally consistent and don’t flicker when the head turns.
The researchers themselves admit head swapping is much harder than face swapping—it has to preserve the target’s expressions while reconstructing your head’s shape, hair, and neck. So if face shape feels hard to you, that’s completely normal.
Solution ④ Make the two faces look “shot by one camera”: light, color, edges
This step erases the “collage” feel, and regular users can do it too:
- Match brightness.If the source face is brightly lit but the target is a dim café, adjust one—brighten the dark one or darken the bright one (many editors let you adjust “highlights” and “shadows” separately) so both faces look like they’re in the same environment.
- Match color temperature.Warm with warm, cool with cool. If they’re far apart, swap in a source with a closer color temperature—truer than forcing corrections.
- Soften the edges (feather).The border should be a gradual transition you can’t see, not a hard line.
- Fix the jawline seam(if there’s an uneven brightness ring along the jaw): select a strip about 10 pixels wide along the seam → apply a 2-pixel “Gaussian blur” (a blur that softens edges) → then use the “Curves” tool to nudge that strip’s brightness until both sides match.
- Fix the hairline halo(that ring of white): don’t touch the mask—instead, make a new layer, sample the clean hair color nearby, and use a 1–3 pixel brush to gently paint over it following the hair direction.
- Zoom to 200% and check before exporting(that is, view it at 2×), scanning along the jaw and hairline for any tells.
Matching light and color is often the single biggest line between “obviously fake” and “convincingly real.”
Solution ⑤ Video face swap: why it’s harder, and how to do it
Photos are already full of pitfalls; video is a level harder. The challenge is called temporal consistency—in plain words:video is made of frames in sequence, and the swapped face has to be “the same person, the same look” in every single frame.
The most common failure: the personturns their head, the face isbriefly blockedby a hand or hair, or motion gets fast—and the swapped face starts toflicker, jitter, warp, or even snap back to the original face(the pros call this “identity drift”).
How to do it:
- Pick good footage:front-facing or slightly turned, evenly lit, with the face mostly unobstructed; keep occluded shots under 20% of the frames.
- Tune settings by symptom(many video tools have these sliders): edges flickering → lower “blend strength” by 5–10%; colors off → turn on or raise “color matching”; detail blurry → adjust “face enhancement.”
- Watch the whole clip before exporting,focusing on head turns, profiles, and the hairline for jitter.
- Be wary of “instant” output:if a tool claims to swap a 15-second-plus video in a few seconds, it probably cut corners on motion handling, and the result will flicker and break.Good video face swap takes time to compute—too fast is a red flag, not a feature.
- Have a benchmark in mind:a good tool can hold up through30–45 degree (even ~60 degree) head turnsand brief occlusion without losing the face. (When the industry scores video realism, “motion stability” weighs 35%, “identity preservation” 20%, “blend realism” 15%, and “occlusion handling” 10%—so turns and occlusion are clearly the danger zones.)
Part 4: The easiest shortcut—let one tool handle all of this automatically
By now you can see it: to make a swap truly realistic, you have to handle image selection, skin texture, face shape, lighting, color, edges, and video temporal consistency—all at once.That’s seven or eight things.
The pro route above (ComfyUI + LoRA + upscaler + tuning + a good GPU) really does deliver top-tier results, but the barrier is high and it eats time.
So for most people,the best way to “keep it realistic” is to just use a tool that has already solved all of these for you.The one we recommend most for beginners isDeepSwap.

Across multiple 2026 tests, what DeepSwap is good at happens to be exactly those hardest realism factors:
- Head turns and motion stay stable.It doesn’t dumbly swap frame by frame; it understands the video as “continuous motion,” so the face “sticks like glue” even through quick head turns and doesn’t revert to the original. Many tools start breaking after 15 seconds; it holds steady.
- It auto-adapts to light and skin tone.When the lighting in the scene changes, it adjusts the brightness and skin tone of the swapped face to match—and it only swaps the face, leaving the background untouched.
- It auto-avoids “plastic skin.”In dim, grainy footage, itactively adds matching grain to the swapped faceinstead of pasting on a smooth plastic one.
- It “works around” occlusion.In testing, when an eye was covered by flowers, it recognized the obstruction and worked around it instead of pasting an eye over the flowers.
- It supports group photos + high-res output.In a group photo you can swap just a few of the people; it also outputs high-res (4K), easing blur and plastic look.
In other words:you can spend an evening matching light, rebuilding pores, masking heads, fixing edges, and de-flickering—or you can hand all of it to a tool built to keep faces realistic.
When you care most about whether it looks real and don’t want to learn any settings, DeepSwap is the easy choice—upload, swap, done.
A note on using this responsibly
Face swapping is fun, butonly use it with the consent of the people involved.Never use it to deceive, harass, impersonate, or create non-consensual intimate content—this is already illegal in a growing number of countries and regions.
Also,starting August 2026, the EU AI Actrequires AI-generated or face-swapped content to be disclosed/labeled, with similar rules in the US, UK, South Korea, and elsewhere. Labeling your swaps as “AI-edited” is both compliant and more responsible.
A table to match your problem to a fix
| Your problem | How to fix it |
|---|---|
| Skin too smooth, like a mannequin | Don’t beauty-filter the source, keep it sharp; turn on “face enhancement”; advanced: skin detail LoRA (strength 0.2) + Detail Daemon + skin upscaler, plus a denoise≈0.2 i2i refine pass and 0.1–0.3 grain;don’t try to rescue it with a plain upscaler |
| Features right but doesn’t look like the person | Switch to a “head swap”: mask + local repaint on the head, or Klein + BFS/Ultra-Real LoRA; describe the target’s features in the prompt |
| Looks worse after upscaling | Use a “face-friendly” upscaler (SeedVR2+SRPO / Crystal); push CodeFormer’s fidelity weight w lower |
| Obviously “pasted on” | Match light direction, brightness, and color temperature; pick a closer-temperature source; feather the edges |
| White halo around the hairline | New layer, sample nearby hair color, paint along the hair with a 1–3 px brush; zoom to 200% before exporting |
| Video breaks/flickers on head turns | Pick footage with <20% occlusion; lower blend strength 5–10%, turn on color matching; don’t trust “instant”; use a temporally stable tool |
| Don’t want to study all of this | Just use a tool that handles it all automatically (DeepSwap) |
Realism doesn’t come from one magic button—it comes from taking care of a chain of small details.
The good news: you can either pick at them one by one yourself, or hand them to a tool that’s already picked at them for you. Either way, you now know exactly where “real” goes wrong and how to fix it.